Sunday, October 7, 2012

Babysitting Manners & Etiquette for Young Ladies


We recently had a "Manners & Etiquette" class for the 12 & 13 year old girls (Beehives) in our church youth group.  I was asked to do a segment on Babysitting Manners & Etiquette for them.  In order to make my presentation more complete, I asked my Facebook friends for contributions... and boy, did it get people fired up!  As it turns out, many of the experiences my friends had with their babysitters weren't isolated incidents.  They were shared.  [Apparently, babysitters these days need a little training!]  I was able to fit each suggestion into one of three categories: "Do," "Don't Do" and "Know."


DO: 


  • For an infant, keep a log of when they ate and how much, when they were changed, etc for the parents.
  • Do any chores the parents asked you to do (like rinse off dishes).
  • Put the kids to bed on time (not too early, not late) and in their pajamas, not their clothes/shoes, and with teeth brushed.
  • Close curtains/blinds and turn on the front porch light when it gets dark.  Keep the front door locked at all times.
  • Clean up after yourself and the kids -- leave the house cleaner than you found it.
  • Give the kids your full attention at all times -- play with them!
  • Bring your own snacks/sack lunch if you'll be there a while.
  • Change diapers, especially poopy ones!  If you aren't willing to change diapers, don't babysit kids in diapers. 
  • Be kind to house pets or leave them alone.
  • At least rinse dishes and stack them neatly in the sink -- even better, load them into the dishwasher.


DO NOT:


  • Do not go into the parent's bedroom (unless the crib is in there).
  • Do not talk on the phone/text/play iPod or video games (ok once kids are asleep and house is tidy).
  • Do not yell or raise your voice to the kids.
  • Do not invite anyone over without prior approval from the parents -- NO BOYS, PERIOD.
  • Do not open the door for anyone.
  • Do not eat anything unless the parents offer it for you to have while you are there (ok to eat what the kids are eating).
  • Do not watch movies/TV unless the parents said it was okay, and never the whole time.
  • Do not use the computer/internet while babysitting.
  • Do not put the kids to bed with snacks (sticky/crumbs in bed - yuck!)
  • Do not take the kids anywhere, even if the park is close by.


KNOW:


  • Know where the address and parents' phone numbers are written in case of an emergency.
  • Know basic child development: infant, toddler, preschooler -- for instance, know how to calm a fussy baby (do not ignore the baby!)
  • Know basic first aid/choking/CPR
  • Know where the parents will be if you can't get a hold of them in an emergency on their cell phone.
  • Know that kids tell their parents everything... and often ask for a specific sitter they like.  Behave accordingly!
  • Know if the kids have any allergies or restrictions on what they can eat or do.
  • Know what the expectations/rules are for the kids and let the parents know if there were any problems.
  • Know basic safety (don't leave kids unattended in the tub, don't leave knives within reach of kids, supervise kids when eating,etc.)
  • Know some fun games to play with the kids to keep them entertained (however, hide and seek is not necessarily a good idea)
  • Know what your fee will be when people ask.  Know what a fair asking price is for babysitters in your area.  (When you are paid, don't count your money in front of the parents.)


As a follow up to this segment, and because of the responses I received from friends, we have decided to teach a babysitting series of classes ranging from first aid/CPR to child development and ending with putting together a babysitting kit with things and ideas to keep kids entertained.  [For those who are LDS, if you teach a full series that takes 10 or more hours to complete, the girls who participate in all the activities can count it for a Personal Progress Value Project for Knowledge.]  

Interestingly enough, we determined that in many instances, parents who are hiring babysitters need a few tips on etiquette and manners as well.  Such as: leave the babysitter with a basically tidy/clean house, pay a little extra if the babysitter goes above and beyond, arrange a babysitter ahead of time (like 24 hours, at least) and not wait till the last minute, commit to a time you'll be home and call if you're running late, etc.  These came from the girls doing the babysitting.  :)

Feel free to comment with additional ideas for babysitting manners & etiquette you would add to this list for the benefit of other readers.  We just expect that many of our young ladies simply know how to babysit and care for children, but when we educate them, they can become much better and more valuable babysitters for our children and our communities!


sig4blog

If you're reading this on a feed reader or on Facebook, check out the blog homepage at cleverhomemaking.blogspot.com and follow me on twitter @cleverhomeblog

Saturday, August 11, 2012

Chore Charts & Kid Bucks

I've had many requests lately for my Chore Charts and Kid Bucks System in the pre-assembled/shipped format, so I've added that listing again to my Etsy Shop.  Check it out!  :)

sig4blog

If you're reading this on a feed reader or on Facebook, check out the blog homepage at cleverhomemaking.blogspot.com and follow me on twitter @cleverhomeblog

Sunday, August 5, 2012

Motherhood...

My new favorite quote! :)

If you're reading this on a feed reader or on Facebook, check out the blog homepage at cleverhomemaking.blogspot.com and follow me on twitter @cleverhomeblog

Wednesday, August 1, 2012

Homemade Frozen Cookie Dough

Is there anything better than warm, just-out-of-the-oven cookies?  Have you ever purchased one of those tubs of frozen cookie dough from your child's school fundraiser and wished you could have the convenience of the ready-to-bake dough without paying an arm and a leg for it?  ;)

Making cookie dough to keep in your freezer is really easy and it is an awesome thing to have on hand.  A neighbor's birthday is today?  Take them cookies.  A friend just had her baby?  Take her cookies.  Someone went out of their way to help you out?  Take them cookies.

I like to double my cookie dough recipes when I make cookie dough for the freezer.  It takes me 30 minutes or so and I've got 7-8 dozen cookies that can be hot and gooey in a matter of a few minutes' notice.

1.  Make up a batch (double it) of your favorite cookie dough.  We've done chocolate chip, snickerdoodle, and oatmeal raisin and they've all turned out beautifully.

2.  Roll the dough into 1-inch balls.  (For snickerdoodles, also roll them in the cinnamon/sugar mixture.)  Place the dough balls on a cookie sheet or tray that will fit in your freezer.  Place them fairly close together, just not touching each other.

3.  Let them freeze for a minimum of 30-60 minutes, until they are solid on the outside and won't stick together.

4.  Put the frozen dough balls into a gallon-size freezer zip bag.  Label the bag with what type of cookie is in it, and the temperature called for in the recipe.  For the baking time, add 2 minutes. No need to defrost ahead of time.


Enjoy!

sig4blog

If you're reading this on a feed reader or on Facebook, check out the blog homepage at cleverhomemaking.blogspot.com and follow me on twitter @cleverhomeblog

Sunday, December 25, 2011

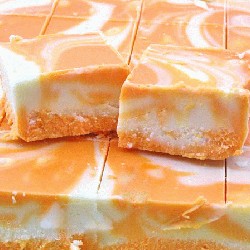
Orange Creamsicle Fudge

Last year, for neighbor and co-worker gifts, I made little boxes of fudge and truffles. I made chocolate fudge, butterscotch fudge, and peppermint fudge along with rich dark chocolate/cream cheese truffles. When I found this recipe for Orange Creamsicle fudge, I knew I had to try it! Everyone I shared it with raved about it. Super yummy!


ORANGE CREAMSICLE FUDGE

Ingredients:

3/4 C. butter
2 C. sugar
3/4 C. heavy cream
1 package (10-12 oz) white chocolate chips
1 jar (7 oz) marshmallow cream/fluff
1 T. orange extract
food coloring (5 drops red, 12 drops yellow) to make orange

Instructions:

1. Prepare a 9x13 pan by lining it with aluminum foil and spraying it with non-stick cooking spray.

2. In a large, heavy saucepan combine the sugar, cream, and butter over medium heat. Continually stir the mixture until the butter melts and the sugar is completely dissolved.

3. Bring the mixture to a boil and once it starts boiling, stir continuously for 4 minutes (set a timer).

4. Remove the pan from the heat and immediately stir in the white chocolate chips and the marshmallow fluff. Stir until smooth.

5. Working quickly, put about 1 C. of the mixture into a bowl and set aside. Add the orange extract and the food coloring to the saucepan, stirring until it is a smooth, even color.

6. Pour the orange fudge into the prepared pan and spread it into an even layer. Drop the white fudge over the orange fudge by the spoonful. Take a butter knife or toothpick and drag it through the fudge to create swirls.

7. Allow the fudge to set at room temperature for 2 hours or in the fridge for 1 hour. Store in an airtight container.


If you're curious how I made the other flavors of fudge, it's really quite simple. Start with your basic fudge recipe (this is the Jet-Puffed Marshmallow Creme Fantasy Fudge Recipe, my personal fave):

3 cups sugar
3/4 cup margarine
2/3 cup evaporated milk
1 12-oz. (340 g) package semi-sweet chocolate chips
1 7-oz. (198 g) jar Kraft Marshmallow creme
1 cup chopped nuts (optional - I usually leave them out)
1 teaspoon vanilla extract

Traditional method:
Combine sugar, margarine and milk in heavy 2-1/2 quart saucepan; bring to full rolling bail, stirring constantly. Continue boiling 5 minutes over medium heat, stirring. Remove from heat, stir in chocolate till melted. Add marshmallow creme, nuts (optional) and vanilla beat till blended. Pour into greased 13 x 9-inch baking pan. Let cool and cut into 1-inch squares.


- For butterscotch, I substituted the chocolate chips for butterscotch chips.
- For peppermint, I used regular semi-sweet chocolate chips but used peppermint extract instead of vanilla and sprinkled the top with crushed peppermint candies before the fudge set (pressing down slightly to get it to stick to the fudge).
- I also thought about making peanut butter fudge using peanut butter chips, but never got that far. I'm sure they'd be yummy too!

MERRY CHRISTMAS, Clever Homemaking friends!


sig4blog

If you're reading this on a feed reader or on Facebook, check out the blog homepage at cleverhomemaking.blogspot.com and follow me on twitter @cleverhomeblog

Tuesday, October 25, 2011

Pinterest Etiquette


Anyone else annoyed when they try to follow a pin on Pinterest, only to get to a blog where you can't find the post that was originally pinned? ;)

sig4blog

p.s. To find me on Pinterest, I am kimijoy357. Happy pinning!

If you're reading this on a feed reader or on Facebook, check out the blog homepage at cleverhomemaking.blogspot.com and follow me on twitter @cleverhomeblog

Friday, July 29, 2011

Dishwasher Trick

Our maintenance guy gave me a pointer the other day when he was fixing our dishwasher and I had to share! Just before you start your dishwasher, run the hot water tap until the water is hot, turn off the tap, then start your dishwasher. Otherwise, you're starting the dishwasher running with COLD water (unless your water heater is in your kitchen, which most aren't). Your dishes will be cleaner because your dishwasher is designed to work with HOT water. It works, trust me! :)

sig4blog

If you're reading this on a feed reader or on Facebook, check out the blog homepage at cleverhomemaking.blogspot.com and follow me on twitter @cleverhomeblog

Friday, July 22, 2011

Cleaning with Kids

I tried a different approach this past week when we teamed up as a family to clean house, and it really worked!

I went to each room that needed cleaning and wrote down all the individual tasks that needed doing. I put the list of tasks on a small piece of paper and taped it to the light switch in that room.

Because the cleaning was broken down into small tasks, it all got done! (These lists are for weekly cleaning tasks, not heavy deep cleaning, and we started in the morning when the house was still reasonably tidy.)

For example, the kitchen list looked like this:

KITCHEN

dispose of leftovers in fridge

wipe down fridge & dishwasher doors/handles

scour sink & faucet, rinse well

wipe down counters with disinfectant

clean microwave inside & out

clean stove top (& pans), wipe down front

sweep and mop floor

empty trash & recycling

add to the shopping list any supplies needed

The kids would mark off what they completed, but left the lists in place. I came through when they were done and double checked that each task had been completed properly.

There were a few things that I marked with an "M" meaning Mom would do them (toilets, for example). Mostly because I knew otherwise, they wouldn't get done! :)

I typed the lists up and will just print, cut, and tape the lists up next time. There's something about being able to mark something off a list that is incredibly satisfying, even for kids. :)

My house was clean in record time and I was one happy momma!


sig4blog

If you're reading this on a feed reader or on Facebook, check out the blog homepage at cleverhomemaking.blogspot.com and follow me on twitter @cleverhomeblog
Wednesday, June 1, 2011

Renewed Etsy Listings for Chore Charts

Dear Friends,

I had no idea my Etsy listings had expired for my Chore Charts! Oops! They have been re-listed. Sorry 'bout that! :)

sig4blog

If you're reading this on a feed reader or on Facebook, check out the blog homepage at cleverhomemaking.blogspot.com and follow me on twitter @cleverhomeblog

Saturday, April 23, 2011

Homemade Instant Oatmeal Packets

Along the same lines as the mixes post below, I am sharing with you my new favorite "make it at home instead of buy it" money-saving recipe. INSTANT OATMEAL. Those little packets that you have to eat 3 of in order to not be hungry by 10am (ok maybe just 2?). Anyway, all kidding aside, these little things are packed with preservatives and additives. We've recently given up cold cereal at our house (I know, we're crazy!) and this is our g0-to breakfast now. These are generously sized, so they're equal to about 2 of the little packets you buy at the store. You can half the amounts below for little kid packets, but we've got all big kids at our house and these are just the right size for school-age appetites. I spend less than 30 minutes putting these little packets together and we're set for the whole week!

~~~~~~~~~~~~~~~~~~~~~~~~~~~~~~~~~~~~~~~~~~~~~~~~~~~~

INSTANT OATMEAL

First, process some of your quick oats in the blender or food processor until powdery. How much you process depends on how many packets you're planning to make. Start with processing 1-2 C. and go from there, processing more as needed.

START WITH: 1/2 C. oatmeal (quick works best) + 1/4 tsp. salt + 1/4 C. powdered oats

THEN ADD...

SWEETENED OATMEAL: 1-2 T. sugar

BROWN SUGAR / CINNAMON: 1-2 T. brown sugar + 1/2 tsp. cinnamon

RAISINS / BROWN SUGAR: 1-2 T. brown sugar + 2 T. raisins

CINNAMON RAISIN (my personal fave): 1-2 T. brown sugar + 1/2 tsp. cinnamon + 2 T. raisins

APPLE CINNAMON: 1-2 T. sugar + 1/2 tsp. cinnamon + 1/4 C. chopped dried apples

APPLE CINNAMON RAISIN: 1-2 t. sugar + 1/2 tsp. cinnamon + 2 T. raisins + 2 T. chopped dried apples

FRUIT AND CREAM: 1-2 T. sugar + 2 T. non-dairy coffee creamer + 1/2 C. dried fruit

TO COOK: Empty oatmeal mix into a bowl. Add 1/2-3/4 C. boiling water. Stir and let stand for 2 minutes. Adjust as desired for thinner or thicker oatmeal. Alternately, you can add 1/2-3/4 C. water from the tap, stir, and microwave for 1-2 minutes. Add milk, stir, and enjoy!

~~~~~~~~~~~~~~~~~~~~~~~~~~~~~~~~~~~~~~~~~~~~~~~~~~~~~

A few notes to the above...
- Store in air-tight containers (snack-size baggies are just the right size). Write the flavor with a sharpie on the outside before filling.
- The original recipes I found call for the larger amount of sugar, but we've found the smaller amount to be sufficient. Start with less and add more if needed.
- I usually like to add about twice the given amount of raisins. Yum!
- If you're using dried fruit, make sure it is SOFT. If using bananas, for instance, banana "chips" won't work. They'll be crunchy little bits in your oatmeal. But hey, if you like 'em that way, more power to ya. :)
- The easiest way to chop soft dried fruit is with a pair of kitchen shears.
- Quick oatmeal works best, and you don't have to process any of the oatmeal if you don't want to. Just omit the powdered oatmeal. The processed oatmeal makes the finished product more "mushy" like the store-bought packets, but is not necessary. I like my oatmeal with a little more texture anyway so I forgo processing the oats.
- Look for oatmeal in the bulk foods section at your grocery store. It is usually a lot less expensive than the canisters. Or buy it in a large bag or bucket from your warehouse club store.


sig4blog

If you're reading this on a feed reader or on Facebook, check out the blog homepage at cleverhomemaking.blogspot.com and follow me on twitter @cleverhomeblog

Wednesday, January 5, 2011

Mixes

Those packets you purchase at the grocery store sometimes have additives like MSG and extra sodium or thickening chemicals. Yuck. Plus, they're way over-priced when they charge at least $.50 (but usually more) for a few tablespoons of spices, for crying out loud! Try the "recipes" below instead next time. Tweak them according to your taste. I've used both of them and they're great! The chili was a little too "hot" for our liking, so I'll probably dial down the red pepper and/or the cumin in that one next time. They're super yummy and now you'll know *exactly* what is going into your chili or tacos that makes them taste so good! :)

  • 1/4 C all-purpose flour
  • 4 tsp chili powder
  • 1 T crushed red pepper
  • 1 T dried minced onion
  • 1 T dried, minced garlic
  • 2 tsp white sugar
  • 2 tsp ground cumin
  • 2 tsp dried parsley
  • 2 tsp salt
  • 1 tsp dried basil
  • 1/4 tsp ground black pepper

  • 1 T chili powder
  • 1/4 tsp garlic powder
  • 1/4 tsp onion powder
  • 1/4 tsp crushed red pepper flakes
  • 1/4 tsp dried oregano
  • 1/2 tsp paprika
  • 1 1/2 tsp ground cumin
  • 1 tsp sea salt
  • 1 tsp black pepper

For each mix, use approximately 3 T per pound of meat (although the taco mix only makes about 3 T, so you'll use all of it).

Next time you go to purchase one of those little packets at the store, see if you can't find a "recipe" online for the same thing withOUT unnecessary additives. It's worth 5 minutes of your time, don't you think? :)

Happy cooking!!

sig4blog

If you're reading this on a feed reader or on Facebook, check out the blog homepage at cleverhomemaking.blogspot.com.

Saturday, November 27, 2010

Programmable Slow Cooker with Delayed Timer, for FREE!

Do you already own a slow cooker? Did you wish you had a slow cooker with one of those nifty delayed timers? Wish no more! :)

When you get your Christmas stuff out this year, hang on to that timer for your lights. Plug your slow cooker into it and you have yourself a programmable, delayed timer for your slow cooker! Set the timer to come on when you want the slow cooker to start. Make sure it's on long enough (don't set it to only be on for an hour or something -- disaster!). Plug the slow cooker into the timer and the timer into the wall. Turn the slow cooker knob to high or low (whichever you need for your recipe) and walk away. This is great when you are gone from the house for 12 hours a day but only want to cook something that calls for 5 hours on low.

Be smart about using the delayed start... Don't cook anything with ingredients that will spoil if sitting out on the counter for a couple of hours before the slow cooker comes on.

Happy cooking!!

sig4blog

If you're reading this on a feed reader or on Facebook, check out the blog homepage at cleverhomemaking.blogspot.com.

Saturday, October 16, 2010

Chore Charts & Kid Bucks System on Etsy

Dear Friends -

I recently had about 24 hours where I had no chore charts listed on Etsy -- whoops! Sorry about that! I try to keep my listings current and I apologize for those who were trying to purchase the system (or even view it) and I fell behind. You can always just email me directly and I can work with you to purchase the system from me without going through Etsy. Whatever is easiest for you. :) So... there are more sets of my Chore Charts listed on Etsy if anybody was interested.

Thank you!


sig4blog
If you're reading this on a feed reader or on Facebook, check out the blog homepage at Cleverhomemaking.blogspot.com.

Sunday, September 12, 2010

Sweet & Sour Meatballs - Yummy!

I love sweet & sour stuff, and I found the BEST recipe for sweet and sour meatballs with the sauce made from scratch. It would work easily to switch out the type of meat and make it sweet & sour chicken or sweet & sour pork. Heck, you could throw in a bunch of baked chicken nuggets if you wanted to make it super easy! :) The recipe below serves at least 8 -- but you won't mind the leftovers, trust me!

SWEET & SOUR MEATBALLS*
2 16-oz bags of frozen meatballs (plain, not Italian; ~32 1" meatballs per bag)
1 20-oz can of pineapple tidbits in pineapple juice
1 large green pepper, coarsely chopped
1 C. packed brown sugar
2 T. cornstarch
2/3 C. vinegar
2 T. soy sauce

Bake the meatballs for 10 minutes at 350 degrees (just enough that they're no longer frozen and they're warm to the touch). While they're baking, combine the brown sugar and cornstarch in a large skillet. Stir in the pineapple tidbits with all the juice, the vinegar, and the soy sauce. Heat to boiling, stirring constantly. Reduce heat. Add meatballs. Cover; simmer, stirring occasionally, for about 10 minutes. Stir in the chopped green pepper. Cover; simmer until crisp-tender, about 5-7 minutes. Serve over warm rice.

You can change it up by adding more veggies like different colored peppers, snow peas, carrots, etc. This would also be a great as an appetizer, minus the rice.

*Original recipe from Cooks.com with some variation.

sig4blog

If you're reading this on a feed reader or on Facebook, check out the blog homepage at cleverhomemaking.blogspot.com.

Monday, August 16, 2010

Foaming Soap

Don't buy the expensive foaming soap for your favorite foaming soap dispenser. All they are is watered-down soap! Fill your foaming dispenser with about an inch of regular soap then fill the rest of the way with water (you may need to adjust these estimates, depending on the size of your dispenser). Cap the dispenser and tilt it back and forth until the water and soap are mixed together. Do NOT shake it! You'll have soapy suds everywhere! :)

p.s. This will not work with creamy hand soaps. Must be the clear-ish kind of hand soap.

sig4blog
If you're reading this on a feed reader or on Facebook, check out the blog homepage at Cleverhomemaking.blogspot.com.

Thursday, July 22, 2010

Waste Not...

I have recently discovered Raising Olives. (So many great ideas for families large and small!) I learned a really cool tip I had to share...

To cut down on wasted toilet paper (you know, when little people take more than they need off the roll because they just pull and tear without thinking...?), before you put place the toilet paper on the roll, smash it so that you bend and flatten the cardboard tube. It won't be as quick to unroll 3 feet when you only want/need half of that. Brilliant! :)


sig4blog

If you're reading this on a feed reader or on Facebook, check out the blog homepage at cleverhomemaking.blogspot.com.

Monday, July 12, 2010

Preparing Your Home for Your Vacation

Things to consider regarding your home when going on a vacation:


- Use timers on lights and radios/tv's... Leave blinds open just the slightest to allow the light to shine out.

- Have a neighbor park in your driveway to give the illusion that someone is home.

- Coordinate with a neighbor to make sure your trash cans get out and then get pulled back in if the trash collection happens while you're away. Trash cans left at the curb or not put out on trash day are a dead giveaway that nobody's home.

- Have someone bring in mail, water plants, and care for your pets.

- Turn down the ringer on your phone and the volume on your answering machine.

- Pack your car with the garage door closed. Don't advertise to just anyone driving by that you're planning on leaving your home unoccupied.

- For added security, unplug your garage door opener (after you've gotten your car out of the garage and closed the door again, of course).

- Shut off valves to your washing machine and to toilets and sinks. It's added insurance you won't come home to a flood!

- Open doors to rooms/closets so your house will smell less stuffy when you come home. Don't leave windows open, however.

- Clean out your fridge. Get rid of anything that will be past its usefulness when you get home. Take the garbage all the way out of the house and into the cans that will go out on trash day (see #3).

- Make a plan for your first meal or two after you return. Use shelf-stable items or frozen foods, but have a plan so you don't have to rush to the store first thing the next morning to grab something for breakfast.
- Turn down your thermostat to save energy while you're gone.

- DO NOT announce your absence to your Facebook page, your Twitter, or on your blog. You never know who reads your post, and you don't know who you can trust. Save your posting for after you're home. Better safe than sorry!


What did I miss?? Any other ideas??

sig4blog

If you're reading this on a feed reader or on Facebook, check out the blog homepage at Cleverhomemaking.blogspot.com.

Tuesday, June 29, 2010

Recipe Sites

Besides the "Queen" of all recipe websites, AllRecipes.com, did you know that many food manufacturers and grocery chains also have collections of recipes on their websites?

Here's a few to get you started...


And grocery chains as well...


What grocery chains do you have near you that also have a website full of recipes? What food manufacturers have you found that have great recipes on their websites as well?

Please share!


sig4blog

If you're reading this on a feed reader or on Facebook, check out the blog homepage at Cleverhomemaking.blogspot.com.

Sunday, June 20, 2010

Summer Game-Plan

Summer is full of carefree, lazy days. Well, mostly. Around here, we thrive on routine. So, we have a "Summer Schedule" that still allows for hours of free time each day, but the structure that my children need as well. Summer is also a great time to instigate a chore chart system for your children. I am still selling my Chore Charts & Kid Bucks system on Etsy if you're interested. ;)


Our Summer Schedule:

Wake - 9:30am: Breakfast, AM Lists, Morning Jobs, then TV time (cartoons!)

9:30 - 11:30 am: Free Time or Outing (Library, Park, etc)

11:30 - 12:00pm: Lunch

12:00 - 1:30pm: Quiet Time

1:30 - 2:30pm: Free Time

2:30 - 3:30pm: Summer School

3:30 - 4:00pm: Cleaning Jobs

4:00 - 5:30pm: TV / Movie / Free time

5:30pm: Dinner

6:00 - 8:00pm: Evening Jobs, PM Lists, Reading Time, Family Time


In the morning, the TV doesn't go on for cartoons till all the other items are completed. During the summer we do "Summer School" with our kids -- workbooks and activities to keep their minds sharp between the previous school year and the next. "Cleaning Jobs" are additional responsibilities that we give our children during the summer, and they change every day.

For details on what AM / PM Lists and Morning / Evening Jobs entail, see my post "Family Economic System: Chore Charts & Kid Bucks System."

This schedule is, of course, flexible. We're going to be going to the library once a week, and hoping to do a lot of in-town stay-cation-ing too. :)

Have a great summer!

sig4blog
If you're reading this on a feed reader or on Facebook, check out the blog homepage at Cleverhomemaking.blogspot.com.

Sunday, May 16, 2010

Scuffs & Scrapes

Today is Sunday and had me thinking about how I camouflage the scuffs on my little boys' church shoes. They grow so fast that I just buy the cheapy shoes for them. Every once in a while, though, they manage to scuff the toes. Depending on the shoe, my approach may or may not work for your little guy's shoes. :)

For black dress shoes, when the scuff rubs off the black of the shoe, I take a permanent marker and color it in. Then take petroleum jelly and rub it into the spot to "shine" it. Rub off the excess.

(Nearly) good as new!

sig4blog

If you're reading this on a feed reader or on Facebook, check out the blog homepage at Cleverhomemaking.blogspot.com.