Sunday, December 25, 2011

Orange Creamsicle Fudge

Last year, for neighbor and co-worker gifts, I made little boxes of fudge and truffles. I made chocolate fudge, butterscotch fudge, and peppermint fudge along with rich dark chocolate/cream cheese truffles. When I found this recipe for Orange Creamsicle fudge, I knew I had to try it! Everyone I shared it with raved about it. Super yummy!


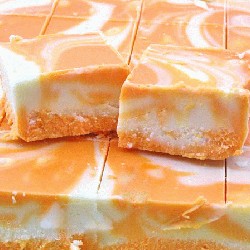
ORANGE CREAMSICLE FUDGE

Ingredients:

3/4 C. butter
2 C. sugar
3/4 C. heavy cream
1 package (10-12 oz) white chocolate chips
1 jar (7 oz) marshmallow cream/fluff
1 T. orange extract
food coloring (5 drops red, 12 drops yellow) to make orange

Instructions:

1. Prepare a 9x13 pan by lining it with aluminum foil and spraying it with non-stick cooking spray.

2. In a large, heavy saucepan combine the sugar, cream, and butter over medium heat. Continually stir the mixture until the butter melts and the sugar is completely dissolved.

3. Bring the mixture to a boil and once it starts boiling, stir continuously for 4 minutes (set a timer).

4. Remove the pan from the heat and immediately stir in the white chocolate chips and the marshmallow fluff. Stir until smooth.

5. Working quickly, put about 1 C. of the mixture into a bowl and set aside. Add the orange extract and the food coloring to the saucepan, stirring until it is a smooth, even color.

6. Pour the orange fudge into the prepared pan and spread it into an even layer. Drop the white fudge over the orange fudge by the spoonful. Take a butter knife or toothpick and drag it through the fudge to create swirls.

7. Allow the fudge to set at room temperature for 2 hours or in the fridge for 1 hour. Store in an airtight container.


If you're curious how I made the other flavors of fudge, it's really quite simple. Start with your basic fudge recipe (this is the Jet-Puffed Marshmallow Creme Fantasy Fudge Recipe, my personal fave):

3 cups sugar
3/4 cup margarine
2/3 cup evaporated milk
1 12-oz. (340 g) package semi-sweet chocolate chips
1 7-oz. (198 g) jar Kraft Marshmallow creme
1 cup chopped nuts (optional - I usually leave them out)
1 teaspoon vanilla extract

Traditional method:
Combine sugar, margarine and milk in heavy 2-1/2 quart saucepan; bring to full rolling bail, stirring constantly. Continue boiling 5 minutes over medium heat, stirring. Remove from heat, stir in chocolate till melted. Add marshmallow creme, nuts (optional) and vanilla beat till blended. Pour into greased 13 x 9-inch baking pan. Let cool and cut into 1-inch squares.


- For butterscotch, I substituted the chocolate chips for butterscotch chips.
- For peppermint, I used regular semi-sweet chocolate chips but used peppermint extract instead of vanilla and sprinkled the top with crushed peppermint candies before the fudge set (pressing down slightly to get it to stick to the fudge).
- I also thought about making peanut butter fudge using peanut butter chips, but never got that far. I'm sure they'd be yummy too!

MERRY CHRISTMAS, Clever Homemaking friends!


sig4blog

If you're reading this on a feed reader or on Facebook, check out the blog homepage at cleverhomemaking.blogspot.com and follow me on twitter @cleverhomeblog

Tuesday, October 25, 2011

Pinterest Etiquette


Anyone else annoyed when they try to follow a pin on Pinterest, only to get to a blog where you can't find the post that was originally pinned? ;)

sig4blog

p.s. To find me on Pinterest, I am kimijoy357. Happy pinning!

If you're reading this on a feed reader or on Facebook, check out the blog homepage at cleverhomemaking.blogspot.com and follow me on twitter @cleverhomeblog

Friday, July 29, 2011

Dishwasher Trick

Our maintenance guy gave me a pointer the other day when he was fixing our dishwasher and I had to share! Just before you start your dishwasher, run the hot water tap until the water is hot, turn off the tap, then start your dishwasher. Otherwise, you're starting the dishwasher running with COLD water (unless your water heater is in your kitchen, which most aren't). Your dishes will be cleaner because your dishwasher is designed to work with HOT water. It works, trust me! :)

sig4blog

If you're reading this on a feed reader or on Facebook, check out the blog homepage at cleverhomemaking.blogspot.com and follow me on twitter @cleverhomeblog

Friday, July 22, 2011

Cleaning with Kids

I tried a different approach this past week when we teamed up as a family to clean house, and it really worked!

I went to each room that needed cleaning and wrote down all the individual tasks that needed doing. I put the list of tasks on a small piece of paper and taped it to the light switch in that room.

Because the cleaning was broken down into small tasks, it all got done! (These lists are for weekly cleaning tasks, not heavy deep cleaning, and we started in the morning when the house was still reasonably tidy.)

For example, the kitchen list looked like this:

KITCHEN

dispose of leftovers in fridge

wipe down fridge & dishwasher doors/handles

scour sink & faucet, rinse well

wipe down counters with disinfectant

clean microwave inside & out

clean stove top (& pans), wipe down front

sweep and mop floor

empty trash & recycling

add to the shopping list any supplies needed

The kids would mark off what they completed, but left the lists in place. I came through when they were done and double checked that each task had been completed properly.

There were a few things that I marked with an "M" meaning Mom would do them (toilets, for example). Mostly because I knew otherwise, they wouldn't get done! :)

I typed the lists up and will just print, cut, and tape the lists up next time. There's something about being able to mark something off a list that is incredibly satisfying, even for kids. :)

My house was clean in record time and I was one happy momma!


sig4blog

If you're reading this on a feed reader or on Facebook, check out the blog homepage at cleverhomemaking.blogspot.com and follow me on twitter @cleverhomeblog

Wednesday, June 1, 2011

Renewed Etsy Listings for Chore Charts

Dear Friends,

I had no idea my Etsy listings had expired for my Chore Charts! Oops! They have been re-listed. Sorry 'bout that! :)

sig4blog

If you're reading this on a feed reader or on Facebook, check out the blog homepage at cleverhomemaking.blogspot.com and follow me on twitter @cleverhomeblog

Saturday, April 23, 2011

Homemade Instant Oatmeal Packets

Along the same lines as the mixes post below, I am sharing with you my new favorite "make it at home instead of buy it" money-saving recipe. INSTANT OATMEAL. Those little packets that you have to eat 3 of in order to not be hungry by 10am (ok maybe just 2?). Anyway, all kidding aside, these little things are packed with preservatives and additives. We've recently given up cold cereal at our house (I know, we're crazy!) and this is our g0-to breakfast now. These are generously sized, so they're equal to about 2 of the little packets you buy at the store. You can half the amounts below for little kid packets, but we've got all big kids at our house and these are just the right size for school-age appetites. I spend less than 30 minutes putting these little packets together and we're set for the whole week!

~~~~~~~~~~~~~~~~~~~~~~~~~~~~~~~~~~~~~~~~~~~~~~~~~~~~

INSTANT OATMEAL

First, process some of your quick oats in the blender or food processor until powdery. How much you process depends on how many packets you're planning to make. Start with processing 1-2 C. and go from there, processing more as needed.

START WITH: 1/2 C. oatmeal (quick works best) + 1/4 tsp. salt + 1/4 C. powdered oats

THEN ADD...

SWEETENED OATMEAL: 1-2 T. sugar

BROWN SUGAR / CINNAMON: 1-2 T. brown sugar + 1/2 tsp. cinnamon

RAISINS / BROWN SUGAR: 1-2 T. brown sugar + 2 T. raisins

CINNAMON RAISIN (my personal fave): 1-2 T. brown sugar + 1/2 tsp. cinnamon + 2 T. raisins

APPLE CINNAMON: 1-2 T. sugar + 1/2 tsp. cinnamon + 1/4 C. chopped dried apples

APPLE CINNAMON RAISIN: 1-2 t. sugar + 1/2 tsp. cinnamon + 2 T. raisins + 2 T. chopped dried apples

FRUIT AND CREAM: 1-2 T. sugar + 2 T. non-dairy coffee creamer + 1/2 C. dried fruit

TO COOK: Empty oatmeal mix into a bowl. Add 1/2-3/4 C. boiling water. Stir and let stand for 2 minutes. Adjust as desired for thinner or thicker oatmeal. Alternately, you can add 1/2-3/4 C. water from the tap, stir, and microwave for 1-2 minutes. Add milk, stir, and enjoy!

~~~~~~~~~~~~~~~~~~~~~~~~~~~~~~~~~~~~~~~~~~~~~~~~~~~~~

A few notes to the above...
- Store in air-tight containers (snack-size baggies are just the right size). Write the flavor with a sharpie on the outside before filling.
- The original recipes I found call for the larger amount of sugar, but we've found the smaller amount to be sufficient. Start with less and add more if needed.
- I usually like to add about twice the given amount of raisins. Yum!
- If you're using dried fruit, make sure it is SOFT. If using bananas, for instance, banana "chips" won't work. They'll be crunchy little bits in your oatmeal. But hey, if you like 'em that way, more power to ya. :)
- The easiest way to chop soft dried fruit is with a pair of kitchen shears.
- Quick oatmeal works best, and you don't have to process any of the oatmeal if you don't want to. Just omit the powdered oatmeal. The processed oatmeal makes the finished product more "mushy" like the store-bought packets, but is not necessary. I like my oatmeal with a little more texture anyway so I forgo processing the oats.
- Look for oatmeal in the bulk foods section at your grocery store. It is usually a lot less expensive than the canisters. Or buy it in a large bag or bucket from your warehouse club store.


sig4blog

If you're reading this on a feed reader or on Facebook, check out the blog homepage at cleverhomemaking.blogspot.com and follow me on twitter @cleverhomeblog

Wednesday, January 5, 2011

Mixes

Those packets you purchase at the grocery store sometimes have additives like MSG and extra sodium or thickening chemicals. Yuck. Plus, they're way over-priced when they charge at least $.50 (but usually more) for a few tablespoons of spices, for crying out loud! Try the "recipes" below instead next time. Tweak them according to your taste. I've used both of them and they're great! The chili was a little too "hot" for our liking, so I'll probably dial down the red pepper and/or the cumin in that one next time. They're super yummy and now you'll know *exactly* what is going into your chili or tacos that makes them taste so good! :)

  • 1/4 C all-purpose flour
  • 4 tsp chili powder
  • 1 T crushed red pepper
  • 1 T dried minced onion
  • 1 T dried, minced garlic
  • 2 tsp white sugar
  • 2 tsp ground cumin
  • 2 tsp dried parsley
  • 2 tsp salt
  • 1 tsp dried basil
  • 1/4 tsp ground black pepper

  • 1 T chili powder
  • 1/4 tsp garlic powder
  • 1/4 tsp onion powder
  • 1/4 tsp crushed red pepper flakes
  • 1/4 tsp dried oregano
  • 1/2 tsp paprika
  • 1 1/2 tsp ground cumin
  • 1 tsp sea salt
  • 1 tsp black pepper

For each mix, use approximately 3 T per pound of meat (although the taco mix only makes about 3 T, so you'll use all of it).

Next time you go to purchase one of those little packets at the store, see if you can't find a "recipe" online for the same thing withOUT unnecessary additives. It's worth 5 minutes of your time, don't you think? :)

Happy cooking!!

sig4blog

If you're reading this on a feed reader or on Facebook, check out the blog homepage at cleverhomemaking.blogspot.com.