Showing posts with label food/cooking. Show all posts

Wednesday, August 1, 2012

Homemade Frozen Cookie Dough

Is there anything better than warm, just-out-of-the-oven cookies?  Have you ever purchased one of those tubs of frozen cookie dough from your child's school fundraiser and wished you could have the convenience of the ready-to-bake dough without paying an arm and a leg for it?  ;)

Making cookie dough to keep in your freezer is really easy and it is an awesome thing to have on hand.  A neighbor's birthday is today?  Take them cookies.  A friend just had her baby?  Take her cookies.  Someone went out of their way to help you out?  Take them cookies.

I like to double my cookie dough recipes when I make cookie dough for the freezer.  It takes me 30 minutes or so and I've got 7-8 dozen cookies that can be hot and gooey in a matter of a few minutes' notice.

1.  Make up a batch (double it) of your favorite cookie dough.  We've done chocolate chip, snickerdoodle, and oatmeal raisin and they've all turned out beautifully.

2.  Roll the dough into 1-inch balls.  (For snickerdoodles, also roll them in the cinnamon/sugar mixture.)  Place the dough balls on a cookie sheet or tray that will fit in your freezer.  Place them fairly close together, just not touching each other.

3.  Let them freeze for a minimum of 30-60 minutes, until they are solid on the outside and won't stick together.

4.  Put the frozen dough balls into a gallon-size freezer zip bag.  Label the bag with what type of cookie is in it, and the temperature called for in the recipe.  For the baking time, add 2 minutes. No need to defrost ahead of time.


Enjoy!

sig4blog

If you're reading this on a feed reader or on Facebook, check out the blog homepage at cleverhomemaking.blogspot.com and follow me on twitter @cleverhomeblog

Sunday, December 25, 2011

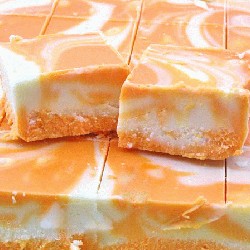
Orange Creamsicle Fudge

Last year, for neighbor and co-worker gifts, I made little boxes of fudge and truffles. I made chocolate fudge, butterscotch fudge, and peppermint fudge along with rich dark chocolate/cream cheese truffles. When I found this recipe for Orange Creamsicle fudge, I knew I had to try it! Everyone I shared it with raved about it. Super yummy!


ORANGE CREAMSICLE FUDGE

Ingredients:

3/4 C. butter
2 C. sugar
3/4 C. heavy cream
1 package (10-12 oz) white chocolate chips
1 jar (7 oz) marshmallow cream/fluff
1 T. orange extract
food coloring (5 drops red, 12 drops yellow) to make orange

Instructions:

1. Prepare a 9x13 pan by lining it with aluminum foil and spraying it with non-stick cooking spray.

2. In a large, heavy saucepan combine the sugar, cream, and butter over medium heat. Continually stir the mixture until the butter melts and the sugar is completely dissolved.

3. Bring the mixture to a boil and once it starts boiling, stir continuously for 4 minutes (set a timer).

4. Remove the pan from the heat and immediately stir in the white chocolate chips and the marshmallow fluff. Stir until smooth.

5. Working quickly, put about 1 C. of the mixture into a bowl and set aside. Add the orange extract and the food coloring to the saucepan, stirring until it is a smooth, even color.

6. Pour the orange fudge into the prepared pan and spread it into an even layer. Drop the white fudge over the orange fudge by the spoonful. Take a butter knife or toothpick and drag it through the fudge to create swirls.

7. Allow the fudge to set at room temperature for 2 hours or in the fridge for 1 hour. Store in an airtight container.


If you're curious how I made the other flavors of fudge, it's really quite simple. Start with your basic fudge recipe (this is the Jet-Puffed Marshmallow Creme Fantasy Fudge Recipe, my personal fave):

3 cups sugar
3/4 cup margarine
2/3 cup evaporated milk
1 12-oz. (340 g) package semi-sweet chocolate chips
1 7-oz. (198 g) jar Kraft Marshmallow creme
1 cup chopped nuts (optional - I usually leave them out)
1 teaspoon vanilla extract

Traditional method:
Combine sugar, margarine and milk in heavy 2-1/2 quart saucepan; bring to full rolling bail, stirring constantly. Continue boiling 5 minutes over medium heat, stirring. Remove from heat, stir in chocolate till melted. Add marshmallow creme, nuts (optional) and vanilla beat till blended. Pour into greased 13 x 9-inch baking pan. Let cool and cut into 1-inch squares.


- For butterscotch, I substituted the chocolate chips for butterscotch chips.
- For peppermint, I used regular semi-sweet chocolate chips but used peppermint extract instead of vanilla and sprinkled the top with crushed peppermint candies before the fudge set (pressing down slightly to get it to stick to the fudge).
- I also thought about making peanut butter fudge using peanut butter chips, but never got that far. I'm sure they'd be yummy too!

MERRY CHRISTMAS, Clever Homemaking friends!


sig4blog

If you're reading this on a feed reader or on Facebook, check out the blog homepage at cleverhomemaking.blogspot.com and follow me on twitter @cleverhomeblog

Saturday, April 23, 2011

Homemade Instant Oatmeal Packets

Along the same lines as the mixes post below, I am sharing with you my new favorite "make it at home instead of buy it" money-saving recipe. INSTANT OATMEAL. Those little packets that you have to eat 3 of in order to not be hungry by 10am (ok maybe just 2?). Anyway, all kidding aside, these little things are packed with preservatives and additives. We've recently given up cold cereal at our house (I know, we're crazy!) and this is our g0-to breakfast now. These are generously sized, so they're equal to about 2 of the little packets you buy at the store. You can half the amounts below for little kid packets, but we've got all big kids at our house and these are just the right size for school-age appetites. I spend less than 30 minutes putting these little packets together and we're set for the whole week!

~~~~~~~~~~~~~~~~~~~~~~~~~~~~~~~~~~~~~~~~~~~~~~~~~~~~

INSTANT OATMEAL

First, process some of your quick oats in the blender or food processor until powdery. How much you process depends on how many packets you're planning to make. Start with processing 1-2 C. and go from there, processing more as needed.

START WITH: 1/2 C. oatmeal (quick works best) + 1/4 tsp. salt + 1/4 C. powdered oats

THEN ADD...

SWEETENED OATMEAL: 1-2 T. sugar

BROWN SUGAR / CINNAMON: 1-2 T. brown sugar + 1/2 tsp. cinnamon

RAISINS / BROWN SUGAR: 1-2 T. brown sugar + 2 T. raisins

CINNAMON RAISIN (my personal fave): 1-2 T. brown sugar + 1/2 tsp. cinnamon + 2 T. raisins

APPLE CINNAMON: 1-2 T. sugar + 1/2 tsp. cinnamon + 1/4 C. chopped dried apples

APPLE CINNAMON RAISIN: 1-2 t. sugar + 1/2 tsp. cinnamon + 2 T. raisins + 2 T. chopped dried apples

FRUIT AND CREAM: 1-2 T. sugar + 2 T. non-dairy coffee creamer + 1/2 C. dried fruit

TO COOK: Empty oatmeal mix into a bowl. Add 1/2-3/4 C. boiling water. Stir and let stand for 2 minutes. Adjust as desired for thinner or thicker oatmeal. Alternately, you can add 1/2-3/4 C. water from the tap, stir, and microwave for 1-2 minutes. Add milk, stir, and enjoy!

~~~~~~~~~~~~~~~~~~~~~~~~~~~~~~~~~~~~~~~~~~~~~~~~~~~~~

A few notes to the above...
- Store in air-tight containers (snack-size baggies are just the right size). Write the flavor with a sharpie on the outside before filling.
- The original recipes I found call for the larger amount of sugar, but we've found the smaller amount to be sufficient. Start with less and add more if needed.
- I usually like to add about twice the given amount of raisins. Yum!
- If you're using dried fruit, make sure it is SOFT. If using bananas, for instance, banana "chips" won't work. They'll be crunchy little bits in your oatmeal. But hey, if you like 'em that way, more power to ya. :)
- The easiest way to chop soft dried fruit is with a pair of kitchen shears.
- Quick oatmeal works best, and you don't have to process any of the oatmeal if you don't want to. Just omit the powdered oatmeal. The processed oatmeal makes the finished product more "mushy" like the store-bought packets, but is not necessary. I like my oatmeal with a little more texture anyway so I forgo processing the oats.
- Look for oatmeal in the bulk foods section at your grocery store. It is usually a lot less expensive than the canisters. Or buy it in a large bag or bucket from your warehouse club store.


sig4blog

If you're reading this on a feed reader or on Facebook, check out the blog homepage at cleverhomemaking.blogspot.com and follow me on twitter @cleverhomeblog

Wednesday, January 5, 2011

Mixes

Those packets you purchase at the grocery store sometimes have additives like MSG and extra sodium or thickening chemicals. Yuck. Plus, they're way over-priced when they charge at least $.50 (but usually more) for a few tablespoons of spices, for crying out loud! Try the "recipes" below instead next time. Tweak them according to your taste. I've used both of them and they're great! The chili was a little too "hot" for our liking, so I'll probably dial down the red pepper and/or the cumin in that one next time. They're super yummy and now you'll know *exactly* what is going into your chili or tacos that makes them taste so good! :)

  • 1/4 C all-purpose flour
  • 4 tsp chili powder
  • 1 T crushed red pepper
  • 1 T dried minced onion
  • 1 T dried, minced garlic
  • 2 tsp white sugar
  • 2 tsp ground cumin
  • 2 tsp dried parsley
  • 2 tsp salt
  • 1 tsp dried basil
  • 1/4 tsp ground black pepper

  • 1 T chili powder
  • 1/4 tsp garlic powder
  • 1/4 tsp onion powder
  • 1/4 tsp crushed red pepper flakes
  • 1/4 tsp dried oregano
  • 1/2 tsp paprika
  • 1 1/2 tsp ground cumin
  • 1 tsp sea salt
  • 1 tsp black pepper

For each mix, use approximately 3 T per pound of meat (although the taco mix only makes about 3 T, so you'll use all of it).

Next time you go to purchase one of those little packets at the store, see if you can't find a "recipe" online for the same thing withOUT unnecessary additives. It's worth 5 minutes of your time, don't you think? :)

Happy cooking!!

sig4blog

If you're reading this on a feed reader or on Facebook, check out the blog homepage at cleverhomemaking.blogspot.com.

Saturday, November 27, 2010

Programmable Slow Cooker with Delayed Timer, for FREE!

Do you already own a slow cooker? Did you wish you had a slow cooker with one of those nifty delayed timers? Wish no more! :)

When you get your Christmas stuff out this year, hang on to that timer for your lights. Plug your slow cooker into it and you have yourself a programmable, delayed timer for your slow cooker! Set the timer to come on when you want the slow cooker to start. Make sure it's on long enough (don't set it to only be on for an hour or something -- disaster!). Plug the slow cooker into the timer and the timer into the wall. Turn the slow cooker knob to high or low (whichever you need for your recipe) and walk away. This is great when you are gone from the house for 12 hours a day but only want to cook something that calls for 5 hours on low.

Be smart about using the delayed start... Don't cook anything with ingredients that will spoil if sitting out on the counter for a couple of hours before the slow cooker comes on.

Happy cooking!!

sig4blog

If you're reading this on a feed reader or on Facebook, check out the blog homepage at cleverhomemaking.blogspot.com.

Tuesday, June 29, 2010

Recipe Sites

Besides the "Queen" of all recipe websites, AllRecipes.com, did you know that many food manufacturers and grocery chains also have collections of recipes on their websites?

Here's a few to get you started...


And grocery chains as well...


What grocery chains do you have near you that also have a website full of recipes? What food manufacturers have you found that have great recipes on their websites as well?

Please share!


sig4blog

If you're reading this on a feed reader or on Facebook, check out the blog homepage at Cleverhomemaking.blogspot.com.

Wednesday, January 13, 2010

Eggs-actly...

Ever get part way through a recipe and realize you're an egg or two short?? Don't toss it - substitute:

1 tsp baking powder
+ 1 1/2 T. water
+ 1 1/2 T oil

for *each egg. No one will ever know! :) Also a good substitute if you have an allergy to eggs or exclude them from your diet for whatever reason. The baking powder will give the baked item the "rising factor" and the oil the "sticking" factor that the eggs usually lend to the recipe. Happy egg-free baking!

*Experts recommend not replacing more than two eggs per recipe.

sig4blog

If you're reading this on a feed reader or on Facebook, check out the blog homepage at cleverhomemaking.blogspot.com.

Sunday, December 20, 2009

F-I-R-E-D!!! + Tub Caulking, Hand-Washables, and Frozen Soup

I'm SO fired...

Has it seriously been more than an entire MONTH since I posted...? Ugh. Life has taken a few turns in the past couple of months and I find myself transitioning from a full-time stay-at-home mom to a working-full-time mom. My husband has been unemployed for 4 months, so the first one of us to find a job took it! For now, this is how we're functioning. It has been a difficult transition, but I'm starting to feel like things are settling into a new routine and I'm not so completely overwhelmed and exhausted at the end of the day that I can't focus on anything else. So...

To make up for the lack of posting in recent days/weeks, I'll give you three teeny little tips that I've had on my list of things to post about...

1. When caulking your tub, fill it with water first. That way, it won't crack with your first bath.
2. Use a colander to rinse hand-washables. Drip dry in the colander for a bit, then lay flat to dry.

3. Take soup leftovers and put one serving each in a smaller freezer or sandwich ziploc bag. Squeeze out as much air as you can before sealing the bag really well. Lay the bags flat in the freezer. Once they're frozen, you can stand them vertically in a basket, labeled along the top. When you want to have soup with your sandwich for lunch (or take it to work to warm up), you can flip through your choices in the flat freezer bags. Fun, huh? Although I do suggest getting the soup out of the freezer the night before and putting it the fridge to defrost. Depending on your bag, I would NOT suggest heating your soup in the bag, open or closed. Defrost it and put it into a bowl first.

So... After all that... Do you forgive me, even a smidge, for being such a slacker of a blogger???

I hereby promise to post AT LEAST weekly from this point forward. :) I swear!!

sig4blog

If you're reading this on a feed reader or on Facebook, check out the blog homepage at Cleverhomemaking.blogspot.com.

Friday, October 16, 2009

56 Meal Ideas

I recently compiled this list of meals that our family tends to rotate through. This list compliments my Meal Planning post from a while back...

There are 56 ideas for main dishes here, which would be 8 weeks if you used one a night. But for good measure, you've got to throw in a few leftovers nights or out-to-eat nights -- so realistically, this list of 56 meal ideas COULD stretch to 9 or 10 weeks without a single repeat! I try to plan at least 2 things each week that are "favorites" with my pickiest eater. I also try to get a variety of red meat/white meat/vegetarian dishes too. And we have a breakfast-for-dinner night every other week (just because it's so stinkin' easy).

Here's the list:
1. turkey roast
2. BBQ chicken or BBQ chicken sandwiches
3. steak
4. potato soup
5. Italian marinated chicken
6. chicken enchiladas
7. fettuccine alfredo
8. spaghetti & meatballs
9. parmesan chicken cacciatorre
10. meatloaf
11. scalloped chicken
12. chimichangas
13. pizza pockets
14. baked ham with pineapple
15. turkey pot pie
16. hamburgers
17. chicken burgers
18. chili
19. hawaiian chicken
20. tacos
21. lasagna
22. chicken alfredo lasagna
23. chicken a la king
24. sloppy joes
25. lemonade chicken
26. beef enchiladas
27. ravioli
28. BBQ pork ribs
29. fried chicken
30. chilidogs
31. taco soup
32. sweet & sour chicken
33. chicken soft tacos
34. pot roast
35. french dip sandwiches
36. white chicken chili
37. salsa chicken
38. homemade pizza
39. beef stew
40. pork chops & applesauce
41. chicken noodle soup
42. teriyaki chicken
43. tuna casserole
44. cheesy chicken
45. manicotti
46. vegetable pizza
47. french toast
48. pancakes :)
49. shepherd's pie
50. vegetable soup
51. macaroni & cheese
52. farmhouse chicken dinner
53. chicken & broccoli casserole
54. turkey soup
55. BBQ beef sandwiches
56. burritos

Is there anything you'd like me to post my recipe for? You can always find recipes on AllRecipes, of course, but I'd be happy to share a personal recipe if you'd like it. And on a side note, any recipe with more than 6-8 ingredients is intimidating to me, so my recipes are usually super simple and easy. :)

Wondering what the point of meal planning is? Read my post about the 10 Benefits of Meal Planning.

How to you organize your family's meals?
What are your favorites that I have missed?


sig4blog

If you're reading this on a feed reader or on Facebook, check out the blog homepage at Cleverhomemaking.blogspot.com.

Friday, July 10, 2009

Grating Soft Cheeses

Before trying to grate soft cheeses (like mozzarella), first wrap it in plastic wrap and toss it in the freezer for 30 minutes. It'll be much easier to grate.

Once it is grated, it can be stored in the fridge for up to 5 days.


sig4blog

If you're reading this on a feed reader or on Facebook, check out the blog homepage at cleverhomemaking.blogspot.com.

Friday, April 24, 2009

Homemade Produce Wash

Another thing to share from the wonderful folks at TipNut.com...

Homemade Produce Wash Recipe:

1 cup water
1 cup vinegar
2 TBS baking soda
2 TBS lemon juice

  • Mix ingredients then pour in clean spray bottle. Spray fresh vegetables & fruit generously. Sit for 5 minutes then rinse off well.
  • Note: Make sure to first mix ingredients in deep container since there will be some fizzing from the baking soda & vinegar.
  • Do NOT use this with mushrooms - they will only absorb it.
You can also use a 50/50 mixture of water and vinegar. Spray on fruits/veggies and let set for 10 minutes before rinsing well.

Fruit & Veggie Soak Recipe:

1/2 cup vinegar
3 TBS salt

  • Mix ingredients to dissolve salt then add to (a clean) sinkful of water (stir to mix). Soak fruit and veggies for 15 to 20 minutes. Remove, pat dry.

Did You Know: You should wash the outsides of melons before cutting through them? If you don’t, the knife will drag the pesticides/dirt/bacteria from the outside rind into the fruit as you cut. Many melons share fields with livestock and their "droppings." Yikes! So wash well!


sig4blog

Monday, April 6, 2009

Creamy Macaroni & Cheese

I learned a tip a few years ago on how to get the powdered cheese sauce on your kids' mac & cheese to not come out "lumpy" with chunks of the powdered cheese amongst the macaroni noodles.

After draining the water from the macaroni, put the butter/margarine in the pan with the hot pasta and stir till it is melted. Put the milk and powdered cheese sauce in a small bowl with a lid (one that seals well). Put the lid on it, then shake till all the powder is dissolved. Stir this into your buttered noodles.

Happy eatin', kids! :)

sig4blog

Monday, March 30, 2009

Substitutions for Alcohol in Cooking

(Rebecca, you knew I'd post this link... I couldn't pass it up!)

When looking for substitutes for alcohol in cooking, go to Gourmet Sleuth for the proper substitutions. I don't like to keep alcohol in my house nor do I like to cook with it, so this is right up my alley!


sig4blog

Thursday, March 26, 2009

Saving Bananas for Bread

You have a few bananas that are overly ripe and you want to save them to make banana bread in the future when the mood strikes you. How do you do that?

Peel the bananas and put them in a plastic freezer bag (you might have to break them in half to get a full bag). Squeeze out all the air you can, seal the bag, and toss it in the freezer.

When you're ready to use the bananas to make yummy banana bread, take the bag out of the freezer, place it in a bowl, and open the bag with the opening facing up so as not to make a mess in the bowl. Use the defrost setting on your microwave till the bananas are thawed. Again, squeeze out as much air as you can and reseal the bag. Gently squeeze the bag with the soft bananas until they are mashed. Then pour them from the bag into a measuring cup for use in your recipe.

My favorite banana bread recipe is below. Yummy!!

Banana Bread


Mix together:

2 cups sugar
2 tsp vanilla
1 cup oil
2 cups mashed banana
3 eggs


In a separate bowl combine the following:

3 cups flour
1 tsp. soda
1 tsp. salt

Combine both mixtures and baked in two greased loaf pans at 350 degrees. Bake for one hour. If not done cover with foil and bake for another 15 minutes.


sig4blog

Monday, March 23, 2009

Know the Real Expiration Date of Your Groceries

I was watching a segment on Good Morning America this morning that was fascinating! The segment was entitled, "Know the Real Expiration Date of Your Groceries." Some of the main points from the segment include:
  • Bacon lasts seven days in the fridge and one month in the freezer.
  • An opened package of cold cuts lasts 3-5 days in the fridge and 1-2 months in the freezer.
  • Hard-boiled eggs will last 7 days in the shell in the fridge.
  • Don't use plastic of any kind directly on your cheese because this creates moisture (which causes cheese to mold faster). Wrap it in wax paper first then wrap it tightly in foil or put it in a plastic bag with all the air squeezed out.
  • Do not wash lettuce leaves before storing them. Simply wrap them in paper towels, then put in a sealed plastic bag.
  • Pack your freezer tight and it uses less energy.
  • Not so much with your fridge. You need air to be able to move between items in your fridge in order to keep them cold, so do NOT pack your fridge tightly.
Some of these items I knew, but others really surprised me!

To see the entire segment, go to the article on the Good Morning America website. (The video segment in its entirety is also on the same page.) Enjoy!

sig4blog

Friday, March 20, 2009

100 Uses for Vinegar

I found a super nifty article at Wide Open Wallet. The article is entitled, "100 Uses for Vinegar." My favorite uses on the list include:
  • Shower head: To unclog a shower head mix 1/2 cup baking soda and 1 cup white distilled vinegar in a sandwich bag. Tie around shower head and let soak for an hour after the bubbling has stopped. Remove bag and turn on the water.
  • Eyeglasses: Wipe each lens with a drop of white distilled vinegar.
  • Hair Rinse: Rinse hair with one cup of white distilled vinegar and warm water. Brings out highlights and removes shampoo buildup.
  • Bruises: speed healing and prevent bruises by soaking a piece of cotton gauze in white or apple cider vinegar and leaving it on the injured area for one hour.
  • Perfect rice: Add a teaspoon of white distilled vinegar to the boiling water.
  • Cut flowers: Add 2 tablespoons white distilled vinegar and 1 teaspoon sugar to a quart of water in a vase. It will preserve fresh flowers and perk up droopy ones.
And last, but not least:
  • Freak out your kids: Turn a chicken bone into rubber by soaking it in a glass of white distilled vinegar for three days.
Check out the link to view the rest of the list. There are some great ideas for using this super-frugal item!

Don't forget, you can also use it as fabric softener. :)

sig4blog

Tuesday, March 17, 2009

Freezing Casseroles

I read the following awesomely clever tip over at Meal Planning Mommies. What a great idea!!
Okay, so you doubled your recipe and have made two casseroles - one for now and one for the freezer. But, you don't want all your casserole dishes in the freezer so what do you do?

Line the casserole dish with clear plastic wrap or foil and then spray with cooking spray. Place your casserole in the dish, cover with plastic wrap and freeze for a few hours until completely frozen. Remove from the freezer and take it out of the dish. Then tightly wrap the food in more plastic wrap/foil, label and place back in the freezer.

When you're ready to eat it take all the plastic wrap off, place back in the original dish and place in the fridge to defrost. Then cook!

Thursday, March 12, 2009

Baking Cookies Without an Oven!

I saw this tip on Rachael Ray, but I can't find it on her website, so I can't include the link... Anywho...

Preheat your pancake griddle to 350 degrees. Put your cookie dough on the griddle just like you would put it on your cookie sheet (2" apart or whatever). Let it cook for about five minutes, then use a spatula to turn it over for another five minutes. And you have cookies without having to use your oven!

This can save on energy and is a great idea for the summer time when you don't want to heat up your house by heating up the oven. I love it! Plus, you end up with two crispy sides on each cookie with a gooey center. Yum!

Wednesday, February 18, 2009

Frozen Cookie Dough

Those tubs of frozen cookie dough that you buy from your kids' school fundraiser are severely over-priced. Make your own frozen cookie dough anytime you want it!


1. Make your favorite cookie dough.

2. Use a cookie scoop or tablespoon and dole out the cookies onto something that has a flat surface and will fit in your freezer. Wax-paper-lined cookie sheets or plastic cutting boards work great.

3. Place in freezer until cookie dough freezes.

4. Scrape off cookie dough balls with a spatula.

5. Place in a gallon size freezer bag or a plastic container of some sort.

6. Write the instructions (i.e. 375 degrees for 9-11 minutes) and what kind they are on the bag or on a tag attached to the container.

Tips:
1. There is no need to defrost the dough before it goes into the oven, but it may take 1-2 minutes longer to cook. Just keep an eye on them.
2. If you have three kinds of cookies in the freezer you can put them on one cookie sheet, assuming they have similar baking instructions. Yummy variety.
3. Want just a couple of fresh, homemade cookies? Then only bake a couple. Portion control at its best!
6. Surprise company or going to visit a friend? Have a dozen hot cookies to share in ten minutes or less! Your popularity will sky-rocket! :)

Friday, February 13, 2009

"Garbage Bowl" Revisited

I've mentioned Rachael Ray on my site a few times, so you probably know I'm a big fan. :) I love her concept of the garbage bowl. If you're not familiar with RR, it's the simple idea of using a bowl to collect all the scraps/garbage while you're cooking, instead of making twenty trips back and forth to the garbage can. My only complaint is the large bowl that now needs cleaning...

I have a new take on the garbage bowl -- well, sort of. You know those plastic grocery sacks you bring home from the grocery store? Use one to line a large bowl. Use this lined bowl as your garbage bowl while cooking. When you're done, lift the bag out of the bowl and toss it. Your bowl is still clean!